| |
|
Introduction |
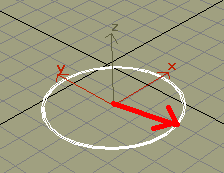
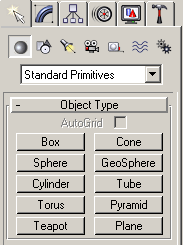
Day One: ModelingLets have an example before we will begin handling our own example. The example helps to understand what will be done and how in more easier way and provides an insight into what is to be done. Creating an SphereIn this step, you create a sphere primitive, color it orange, and name it. You'll also learn some viewing techniques. In the next section, you'll add a realistic orange peel to complete the orange. Choose File / New. This is a blank file that we will start with. Click the Objects tab of the tab panel. Click the Sphere icon. In the command panel, the Sphere button turns green to show that this creation mode is active. Near the center of the Perspective view port, create a sphere by pressing the left mouse button down and dragging away from where you started. As long as you hold the mouse button down, you can adjust the size of the sphere. When you release the mouse button, the sphere is complete. In the Create panel / Parameters rollout, change the Radius field to 50 and press ENTER. Now when we are done you may save this file for security purposes. Save is as a work.max for example. The sphere changes size in the viewport. In 3DS MAX, it's typical practice to rough out an object with the mouse, then reset one or more of its parameters to your specific requirements. Creating a BoxChoose File / Open and open work.max. This is a newly created file that we will continue with. Click the Objects tab of the tab panel. Click the Box icon. In the command panel, the Box button turns green to show that this creation mode is active. Near the sphere that we have just created, create a box by pressing the left mouse button down and dragging away from where you started. As long as you hold the mouse button down, you can adjust the size of the basement of the box. When you release the mouse button, the bottom surface is complete. To move on to the upper surface just move mouse freely to the height you are willing to achieve. In Modify Mode from the Create Panel you may easily change the dimensions of the box by selecting the box in the firs place and then reentering values for length width and height a value of 50. Do it! The box changes size in the view port. In 3DS MAX, it's typical practice to rough out an object with the mouse, then reset one or more of its parameters to your specific requirements. Creating a ConeChoose File / Open / Choose work.max. This is a newly created file that we will continue with. Click the Objects tab of the tab panel. Click the Cone icon. In the command panel, the Cone button turns green to show that this creation mode is active. Near the sphere and the box just created, create a cone by pressing the left mouse button down and dragging away from where you started. As long as you hold the mouse button down, you can adjust the size of the bottom circle. When you release the mouse button, the cones bottom circle is complete.
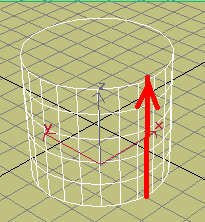
Fig01 Step 1 10. To assign a height to a cone, release the mouse-button and move upwards till you reach a certain height.
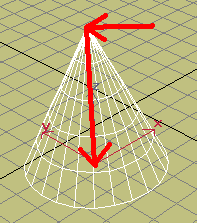
Fig02 Step 2 11. Press and release the mouse button again and move down to connect the vertices of your cone
Fig03 Step 3 12. In the Create panel > Modify Menu, change the Radius1 field to 50, Radius2 field to 0 and height to 50, then press ENTER. The cone changes size in the viewport. In 3DS MAX, it's typical practice to rough out an object with the mouse, then reset one or more of its parameters to your specific requirements.
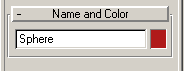
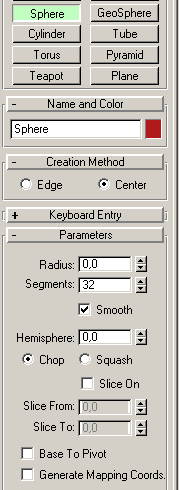
Changing the color and name of the objectBy default, 3DS MAX chooses colors at random for new objects, so the object is probably not orange. You can change the color of the object in the viewport to simulate for example an orange for the sphere. 1. In the Create panel > Name And Color rollout, click the small, colored square next to the default name, Sphere01.
Fig04 Name And Color The Object Color dialog is displayed. 2. Select an orange color and click OK. The sphere in the viewport turns orange. 3. Click the name Sphere01 to highlight it. 4. Type in some new neme to change it for the sphere. Press ENTER to set the new name. Note: Pressing ENTER is the explicit way to make a change to a parameter. 3DS MAX also accepts the change as soon as you click anywhere on the screen.
Viewing the sphereViewport navigation controls let you move around the scene. They are a group of eight buttons at the lower-right of the screen. The set of buttons changes when a camera viewport is active.
Fig05 Viewport navigation
Perspective and Camera navigation buttons1. Only one viewport can be active at a time. The Perspective viewport should still be active. If necessary, right-click in the Perspective viewport to make it active. 2. Click Zoom Extents in the viewport navigation controls. The Perspective viewport zooms in a little. This button affects only the active viewport. 3. Click Zoom Extents All. The other viewports zoom in to show the sphere at a uniform size. You generally use Zoom Extents All to make sure you're seeing all the objects in a scene in all viewports. In this case, there is only one object. On the control panel we have a number of objects available. There are ready generated spheres, boxes, cones, cylinders... SphereShort summary of the steps we have gone throughA bit less precise example what we are going to do in this example. All we need is to select a sphere object on the right from the working area from the command panel. From there we see the list of options box, sphere, cylinder, tours...
Fig06 Shapes For the time being we click on sphere and we are ready to draw.
Fig07 Sphere tools Just move inside the working area and click and drag to specify the dimensions. However they can be altered later.
Fig08 Sphere tools OK we go forward and modify our masterpiece. So from spheres properties tab there are : name and color- for specifying the name and color of an object, keyboard entry - position and radius of the sphere, parameters - radius segments(or the preciseness of the surface), Try playing with those parameters and youll understand better what they mean:)
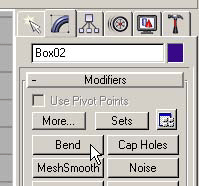
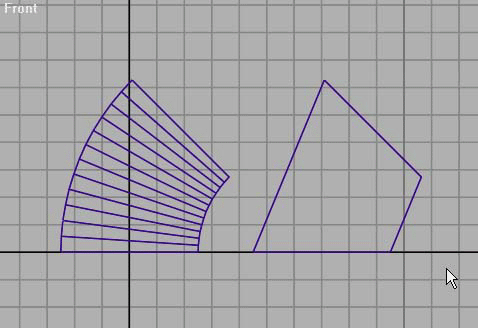
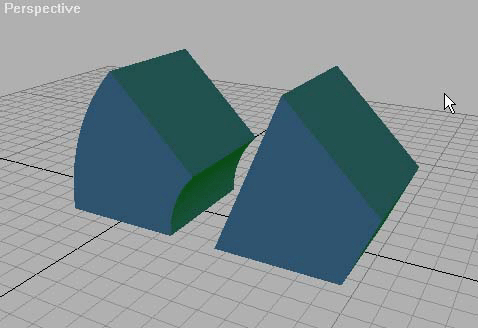
Fig09 Sphere tools in our example we have used for the color-, radius-, segments- Few things to notice before we live the discussion about modeling. Namely when we are dealing with the multiple surfaced objects like sphere or rectangle for example the must always keep track of the reasonable number of those sides we are going to use because it affects on the size of the file and the tien for rendering it. 0. When the form has been built we can assign any number of subsides for preciseness. 1. Open Object window then go to the box 02 object then click on bend then depending on the number if subparts assigned to it youll see it bent.
Fig10 Bend option 2. Then move your pointer inside the box area and click and move to change the shape of your object.
Fig11 Step 1 3. Then change the number of subparts of the square. See what results you get.
Fig12 Step 2 4. Finally apply texturing effect to it see-texturing part of this tutorial.
Fig13 Step 3 |
|
| |